


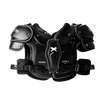


Fitting Guide - Bailey Back Plate Assembly
BACK PLATE FRONT
ASSEMBLY INSTRUCTIONS: XENITH SHOULDER PADS

HARDWARE CONTENTS
- 2 Attachment Straps
- 2 Elastic Hardware Covers
- 4 T-Nuts
- 4 Screws
STEP 1
Feed lower end of attachment strap with two grommets through slot in back plate from outside to inside. Select inner or outer slot to best match up with holes in shoulder pad.

STEP 2
Place elastic hardware cover onto attachment strap.STEP 3
Feed upper end of attachment strap through slot in shoulder pad from outside to inside.

STEP 4
Feed upper end of attachment strap back through elastic hardware cover.STEP 5
Align the two grommet holes on the lower end of the attachment strap with one of the grommet holes from the upper end, and place a t-nut through the three grommet holes from back to front. The vertical position of the pad can be adjusted using the different grommet holes.

STEP 6
Install screw through front of grommet holes into t-nut and tighten.STEP 7
Slide elastic hardware cover over t-nut and screw. Repeat process from step 1 for other attachment strap location.
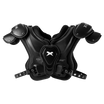
BACK PLATE BACK
ASSEMBLY INSTRUCTIONS: NON-XENITH SHOULDER PADS
HARDWARE CONTENTS
- 4 Attachment Straps
- 4 Elastic Hardware Covers
- 8 T-Nuts
- 8 Screws
STEP 1
Feed lower end of attachment strap with two grommets through slot in back plate from outside to inside. Select inner or outer slot to best match up with slots in shoulder pad.

STEP 2
Place elastic hardware cover onto attachment strap.STEP 3
Place a t-nut through the two lower grommet holes in the strap from back to front.

STEP 4
Install screw through front of grommet holes into t-nut and tighten.STEP 5
Depending on the shoulder pad model used, select an existing hole, or a hole may need to be drilled. NOTE: Drilling your shoulder pad may void the warranty or cause damage; do so only at your own risk. Feed a t-nut through the hole in the shoulder pad from the back, and through a chosen grommet hole in the attachment strap. Pad position can be adjusted by choosing different holes. Install a screw through the grommet hole and into the t-nut to secure the back plate.

STEP 6
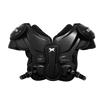
Slide elastic hardware cover over t-nut and screw. Repeat process from step 1 for other attachment strap location.BACK PLATE FRONT
ASSEMBLY INSTRUCTIONS: XENITH SHOULDER PADS
HARDWARE CONTENTS
- 2 Attachment Straps
- 2 Elastic Hardware Covers
- 4 T-Nuts
- 4 Screws
STEP 1
Feed lower end of attachment strap with two grommets through slot in back plate from outside to inside. Select inner or outer slot to best match up with holes in shoulder pad.
STEP 2
Place elastic hardware cover onto attachment strap.
STEP 3
Feed upper end of attachment strap through slot in shoulder pad from outside to inside.
STEP 4
Feed upper end of attachment strap back through elastic hardware cover.
STEP 5
Align the two grommet holes on the lower end of the attachment strap with one of the grommet holes from the upper end, and place a t-nut through the three grommet holes from back to front. The vertical position of the pad can be adjusted using the different grommet holes.
STEP 6
Install screw through front of grommet holes into t-nut and tighten.
STEP 7
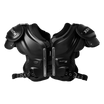
Slide elastic hardware cover over t-nut and screw. Repeat process from step 1 for other attachment strap location.BACK PLATE BACK
ASSEMBLY INSTRUCTIONS: NON-XENITH SHOULDER PADS
HARDWARE CONTENTS
- 2 Attachment Straps
- 2 Elastic Hardware Covers
- 4 T-Nuts
- 4 Screws
STEP 1
Feed lower end of attachment strap with two grommets through slot in back plate from outside to inside. Select inner or outer slot to best match up with holes in shoulder pad.
STEP 2
Place elastic hardware cover onto attachment strap.
STEP 3
Feed upper end of attachment strap through slot in shoulder pad from outside to inside.
STEP 4
Feed upper end of attachment strap back through elastic hardware cover.
STEP 5
Align the two grommet holes on the lower end of the attachment strap with one of the grommet holes from the upper end, and place a t-nut through the three grommet holes from back to front. The vertical position of the pad can be adjusted using the different grommet holes.
STEP 6
Slide elastic hardware cover over t-nut and screw. Repeat process from step 1 for other attachment strap location.Downloads
Download a copy and study it like your playbook.